
This handy crayon caddy roll up is perfect for any child who likes to color! Tuck the crayons into the pockets, roll it up, and go! You will no longer have crayons all over the car, rolling around in your diaper bag or purse and you are prepared wherever you go so your child has a quiet activity to keep them busy in a restaurant, doctor's office, or at church.
A few major differences between these and other crayon rolls, are:
1. These are closed with elastic and a button, which is extremely easy for even toddlers to do on their own (I'll include directions on how to use ribbon as an alternative, also).
2. It will fit any size crayon!
Are you looking for one that will fit more crayons, colored pencils or Twistables? Scroll down to the bottom of the post for modifications on how to make these in a different size.
* I want to apologize for the poor lighting in the pictures. My work space is poorly lit with one small window, so I don't have much to work with.
This is the first tutorial that I've ever done, so your feedback is appreciated, and don't hesitate to let me know if you have any questions!
Let's get started!
Materials you will need:
- 3 pieces of coordinating prewashed fabric (cotton is ideal) cut to 6x9" (6" high by 9" wide) rectangles
- 1 elastic hair tie (these usually come in packages, so if you aren't making more than a few of these, you can use any regular piece of elastic, cut to be about 3.5-4" long) - OR a piece of ribbon - I'm not sure how long since I've never made them with ribbon, but start long and cut it shorter if you need to. Seal the ends of the ribbon with a lighter to be sure it doesn't fray!
- 1 button - any size or style will work (Omit the button if you are using ribbon)
- Needle, thread, sewing machine, scissors, marker (a fabric marker is ideal), iron and ironing board
If you are new to sewing, here are a few terms that you may need some help with (follow the links for a more detailed description with pictures).
Wrong side - The wrong side of the fabric is the back.
Right side - The front of the fabric, the side with the pattern.
Backstitch - Sewing backwards over the stitches you just made

Start by cutting out your 3 (6"x9") pieces of fabric. You may use any combination you would like, I enjoy using 2 coordinating fabrics. You could easily get away with 1/4 yard or a fat quarter of fabric to make this, or even scraps! I used Michael Miller's Groovy Guitars for the outside and pocket and and Ta Dot Lagoon for the inside. I like using solids or simple patterns for the inside, because the crayons are going to cover it anyway.
Choose which fabric you will use for the pocket and fold it in half, wrong sides together, and press with your iron. The other 2 pieces can be pressed to get rid of any wrinkles before you begin.

Next, you will want to place your button on the piece of fabric that will be the back of the crayon caddy. This was the hard part for me the first few times I made these, because I wasn't sure how far in to place the button so it would catch the elastic when the crayon caddy was full. The other blog tutorials that I found would sew on the button last, but I didn't like that either. So I am going to take the guesswork out of it for you and tell you exactly where to place the button so you can sew it on before putting your crayon caddy together, giving you a clean look.
Place your button 3.5" in from the LEFT side of the fabric and directly in the middle (3" from the bottom and top). I eyeball it using my cutting mat as a guide, but you can use a ruler and mark the spot with a marker.
This placement allows the crayon caddy to be closed with many different types and sizes of crayons.

Now, line up and sew on your button. It really doesn't matter how you do it, but make sure it is secure, those little hands will be tugging on it a lot! I usually sew through each hole about 10 times. Here is a quick tutorial on how to sew a button if you are not familiar with sewing buttons.

Now it's time to make the marks for where you will sew your pockets.
The simplest and quickest way that I've found to do this is to use a fabric marker, similar to the one pictured above. If you don't have one, you could also use a regular marker, but I would only mark the bottom of the fabric since you can't remove the marker from the top (unless you use a). You can also draw a full line with an erasable fabric marker and a ruler, if you want to be sure your lines are straight.
Another option that I've seen, is to use your iron to press seams where the pockets will be.

Begin by marking 1.5" in from the side (you can begin at the left or right, it doesn't matter), for your first pocket, then every 1" until you reach the last 1.5" of your fabric. You will be making 7 marks total. You can see that since I used a black fabric, I had to pull out my trusty "dark fabric" disappearing ink marker for a few spots, since it's difficult to see the blue ink on black fabric.

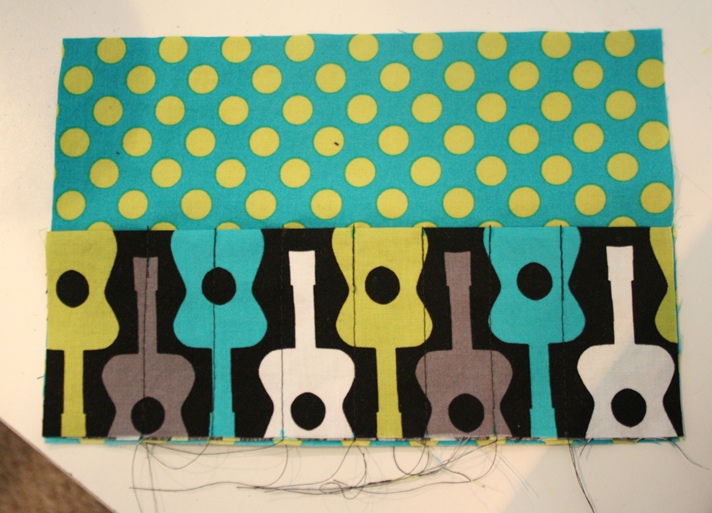
Now place your pocket piece, with the marks facing up, on the piece of fabric you will be using for the inside (the polka dot fabric, for this crayon caddy), making sure the bottom edges of the fabric are lined up. You may want to pin these pieces together until you get comfortable sewing several layers of fabric together without pinning.
If you are making a larger crayon caddy, I strongly suggest pinning it no matter what, because the fabric does shift while sewing.

Now it's time to start sewing your pockets.
Begin at the bottom and I prefer to start at the right because it's easier. Start sewing your first pocket, using your 2 marks as a guide (or following the line, if you drew a full line) to sew a straight line. You do not have to backstitch at the bottom, because you will sew over this spot twice, securing the thread. When you reach the top, backstitch about 1", so it's very secure and the thread doesn't come loose.
This is what the finished piece should look like, making 6 pockets in the middle with 2 open pockets at each end (which will be closed when you put everything together). Now snip off the threads at the bottom.

Next, you will sew on your closure (elastic or ribbon).
If you are using an elastic hair tie, pinch it together at the end and hold it together or put it under the presser foot on your sewing machine. If you are using just a regular piece of elastic, fold it in half, creating a loop. If you are using ribbon, fold it in half and place the fold where the hair tie is shown. Be sure that the usable loop of the elastic or ribbon is facing in toward the middle of the crayon caddy, as pictured.
Then sew over it, backstitch, and repeat - going over it at least 4-6 times.
If you are having difficulty keeping the elastic loop together, sew 1-2 stitches to get over the first part of the elastic, raise your presser foot, and push the other side of the elastic back toward it, so there isn't a big gap. It's not actually a big deal if there is a gap, the elastic will work just as well, I just like it to be centered well.
If you are having difficulty keeping the elastic loop together, sew 1-2 stitches to get over the first part of the elastic, raise your presser foot, and push the other side of the elastic back toward it, so there isn't a big gap. It's not actually a big deal if there is a gap, the elastic will work just as well, I just like it to be centered well.

This is how it will look when it's done. If you'd like, you can cut off the extra part of the elastic on the right, that will be hidden inside of the crayon caddy.

If you used a disappearing ink marker, you can remove the marks now. I use a spray bottle and lightly spray over the top of the pockets or you can use a damp cloth and wet the marks (be sure to read the package of your marker to find out the best way to remove the marks).

The next step is to flip over the back piece so the wrong side is facing up and the button is now on the right side. The easiest way to do this is to flip it over from the left side to the right. It is very important that your button is now on the right, to be sure it is in the right place. If you have a fabric with a pattern that only goes in one direction, that will make it even easier to place since the fabric would be upside down if the button was on the wrong side once it is flipped.

Lay the pieces with the right sides together. Line up all of the sides, and then pin them together.

Starting a few inches in from the top right of the crayon caddy, begin sewing (backstitch to secure the thread, since this is the start of the opening where you will turn your fabric) and sew all the way around your crayon caddy, using whatever seam allowance you choose. I use a 3/8", some prefer a 1/2", and I wouldn't suggest doing much more than that or your side pockets won't be big enough.
Sew until you are about 2.5" from where you began, and backstitch. This leaves an opening so you can turn the crayon caddy.

Snip the corners, to get rid of the excess fabric, so the corners will be less bulky.

This is how it will look when you are done.

Next, it's time to turn your crayon caddy. This is hard to take a picture of since both of my hands are busy. I start by pushing in the corners, then pull the fabric through the opening. After that, I use a small crochet hook to push out the corners the rest of the way. This isn't necessary, but it seems to help push them out all the way, making nice, square corners. You may also use a chopstick or other small object to push out the corners.

Now, lay your fabric with the back side facing up and iron the edges. If you use a disappearing marker like mine, be careful not to iron too far in since the heat will set the marker. Even if you used water to get rid of the marks, I have had them appear again if I iron over them too soon.

To make sure I get the seams straight, I pull the seam back so it's taunt to flatten it, then push it forward before I iron it, and it usually lines up nicely.

Now, turn it over and make sure the opening lined up straight on the other side. If not, straighten it and iron again. You can also iron over the top and bottom (again, avoid the middle) to be sure the fabric is smooth before topstitching.

You're almost done, onto the final step - topstitching! I choose a thread that matches well with the background of whatever fabric I am using for the lining for the main thread and use a thread that matches the background of my patterned fabric, for my bobbin.

Using approximately a 1/4" seam allowance, start at the top left side, backstitch a few stitches, and then sew all the way around, backstitching at the end, also.


You can see how several different types of crayons fit in these crayon caddies - regular, toddler (big/triangular) crayons, Twistables, even 2 regular crayons in each pocket, so you can fit up to 16 total!
Modifications
There are a few modifications you can make to these.


For a bigger crayon caddy, add 1" for each extra pocket that you would like to have.
Shown above is a 16 pocket crayon caddy.

Another modification you can make is a taller crayon caddy, to hold colored pencils or the full size Twistable crayons. To make one this size, start with 9"x9.5" pieces of fabric to make one with 8 pockets. The 9" side of the fabric is the width and the 9.5" side is the height.
Follow the same instructions above.
Modifications
There are a few modifications you can make to these.


For a bigger crayon caddy, add 1" for each extra pocket that you would like to have.
- If you want 12 pockets, start with 6"x13" pieces of fabric.
- If you want a crayon caddy with 16 pockets, start with 6"x17" pieces of fabric
- For one that holds 24 crayons, start with 6"x25" pieces of fabric.
Shown above is a 16 pocket crayon caddy.

Another modification you can make is a taller crayon caddy, to hold colored pencils or the full size Twistable crayons. To make one this size, start with 9"x9.5" pieces of fabric to make one with 8 pockets. The 9" side of the fabric is the width and the 9.5" side is the height.
Follow the same instructions above.
I hope you enjoyed this tutorial and can make a cute little crayon caddy (or several!) for a special little one in your life!
Great tutorial just what I was looking for thank you and a great ironing board cover too
ReplyDeleteThank you, I've purchased my ironing board covers from this lovely Etsy shop: https://www.etsy.com/shop/BarefootLake
DeleteVery cute! Hoping to make a couple of these soon, maybe with a modification to add a notepad pocket! Side note, my sister (a professional seamstress) told me she uses white chalk instead of a fabric marker. It works great on dark fabric. Thanks for sharing our tutorial!
ReplyDeleteYes, that should be easy to do! I'm learning my children also like to have the notepad with the crayons. The chalk is a great idea!
DeleteLoved your tutorial! I am making some mickey/minnie ones for my daughter's 3rd birthday as the party favor. I am a regular sewer but don't like to stray from directions so found your directions super helpful/clear! Thanks so much!
ReplyDeleteI'm so happy to hear that, that was definitely my goal and I'm glad I was able to make the directions clear and easy!
Deletelove it, but that is not knitting needle, its a crochet hook!
ReplyDeleteGood catch, thank you! I'm not sure why I said a knitting needle. I'll need to edit that. ;)
DeleteI looked at other crayon roll tutorials and yours seemed the easiest to follow. I was able to make several as birthday favors for my 2-year old's birthday party. Thank you!
ReplyDeleteWonderful, I'm glad that you found it so easy to follow! I appreciate the feedback!
DeleteThanks for offering this pattern. Just whipped one up for my daughter as a stocking stuffer :)
ReplyDeleteYou are welcome, I'm glad you liked it!
DeleteThank you soooo much...you made this easy for the new sewer like myseld
ReplyDeleteI'm so glad you liked it and found it easy to follow!
DeleteLove this! I want to make party favors out of these! Can I use an elastic band/hair band to just wrap around the whole roll? So I don't have to sew on a button? Might make the project quicker for me :)
ReplyDeleteHi Suzanne! Yes, that is exactly how I do it! It does make it quicker and for a crayon caddy that size, it's not necessary to have the button since the elastic can wrap around it. I will edit the tutorial to include better instructions for a crayon caddy this size!
DeleteI have used your pattern several times for my children and for little gifts for kids. It's so helpful! These are excellent instructions and SO easy to make. Now I put some sort of batting on the inside and make a pocket outside of the crayon roll to hold little notebooks. Thank you so much for the tutorial and the inspiration!
ReplyDeleteJust made two of these for a neighbor's grand kids, and they are so stinking cute!! Two boys, about 3 and 4, one has tractors, and the other has space ships. Thanks so much for sharing these wonderful instructions!!
ReplyDelete